-
Part One: Creating an Address Locator

The Geocoding toolbar in ArcMap 10 includes several ArcGIS online (arcgis.com) geocode services (address locators) that can be used to find places and addresses. For example, you can use the World Geocode Service on ArcGIS Online to find places like "Arizona", "The Grand Canyon", or "123 N Beaver St, Flagstaff, AZ 86001", although resulting locations may not be what you expect. The online geocoding services require your addresses to contain all address elements. If you search "123 N Beaver St" without city and state, you cannot expect the geocoder to find the address in Flagstaff. In fact, the address table that we are going to use in this lab contains all local addresses without city and state information. Moreover, the online geocoding services are relatively slow because all transactions are conducted through the Internet. If you have a large number of addresses to geocode, the online geocoding services can take a long time.
In this part of the lab, you will create an Address Locator for the City of Flagstaff. An Address Locator stores address matching configurations including the reference map and matching parameters.
- Start ArcCatalog and open your geodatabase connection.
- Right click on your geodatabase connection, then select New | Address Locator. The Create Address Locator python dialog box appears.
-
Follow instructions on slide 15 of lecture 9 to create the
address locator. Make sure you:
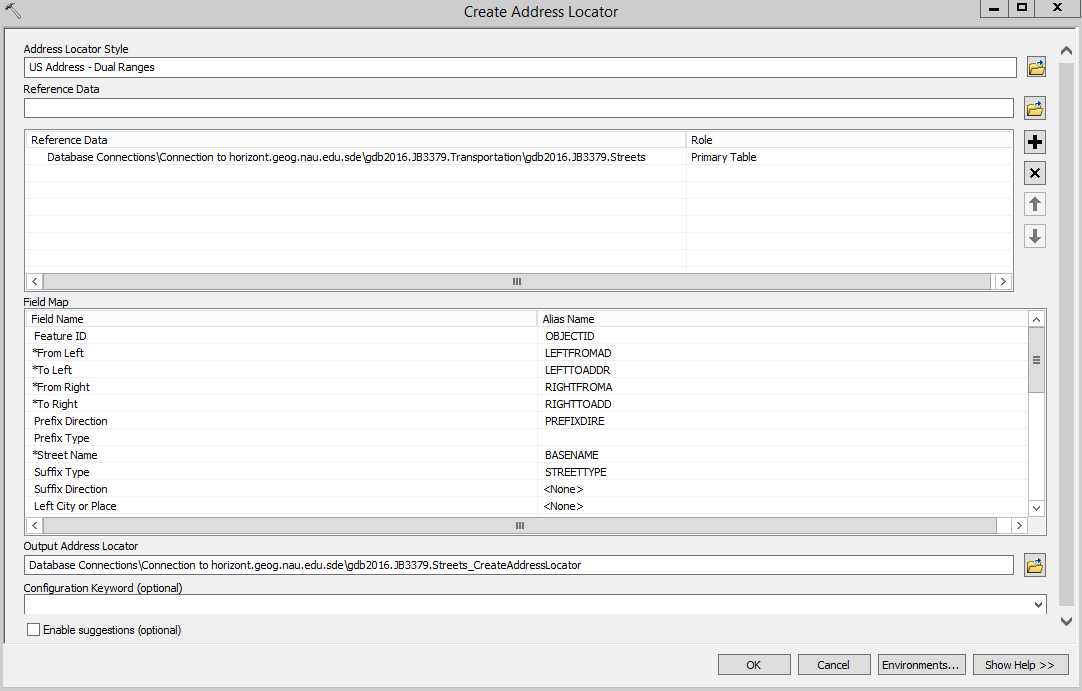
- Select US Address - Dual Ranges in the address locator style box
- Specify the primary reference data by selecting the Streets feature class in your Transportation feature dataset. Make sure to change its role to Primary Table.
-
Map Geocoding fields carefully. Make sure all fields marked with an * are mapped.
Field Name Alias Name *From Left LEFTFROMAD *To Left LEFTTOADDR *From Right RIGHTFROMA *To Right RIGHTTOADD Prefix Direction PREFIXDIRE *Street Name BASENAME Suffix Type STREETTYPE -
Save the output to the geodatabase root, as address locators are global in scope. If the default path is right
don't change it.
Click OK to save. Refresh the database tree to see it. If it has a lox extension, wait a sec; the extension will disappear and the address locator will gain an icon.
-
After creating the address locator, right click on it and view its properties. Set the Match with no zones property value to Yes.
- The Input Address Field section contains alternative field names which will be used by the address locator to detect the street name field in the input tables.
- The Geocoding options section specifies address spelling sensitivity and matching scores. The higher the spelling sensitivity you set, the fewer address candidates will be identified, and vice versa. The minimum candidate score determines whether an alternative address will be considered a candidate. The minimum match score determines whether a candidate address will be considered "matched". You can specify address separators (connectors) for street intersections such as "N San Francisco St & E Cherry Ave". You should choose symbols that are unlikely to appear in addresses. A dot (".") is a bad separator since it is often used in addresses. You can also specify the graphic output styles. For example, if you set the Side offset to 15 (feet), the resulting address point on the map will be 15 feet offset from the street centerline (the reference map).
-
The Output fields section allows you to specify the fields to write in the output feature class.

- Close the Properties box, right-click on the locator, choose Privileges..., and allow the sde user to use your address locator.
- Close ArcCatalog.
-
Part Two: Find Individual Addresses
- Start ArcMap and load your streets feature class into the map.
- On the Geocoding toolbar, select your address locator. It should be called something like USA_LocalComposite, and should be selected by default.
- Type a Flagstaff address (e.g. 1014 beaver st flagstaff az 86001) and hit Enter.
- Click the Find tool on the main toolbar, select the Locations tab, and select your address locater (it should be selected by default).
-
Enter your address in the Full Address box and click the Find button. Example of
an intersection address:
e mcconnell dr & s knoles dr
One or more candidates may appear in the lower box. - Right click on the best match in the lower box and select an output format in the pop-up context menu.
- Close ArcMap.
-
Part Three: Geocode multiple addresses
The Flagstaff Fire Department receives more than one thousand emergency calls each year. In 2001, District 2 received near 300 emergency calls among which addresses were reported or detected for 265 calls. The Fire Department uses this dataset to perform spatial statistics on fire incidents.
-
Open ArcCatalog, import the fire incident table District2 from the R drive
(
R:\gsp536\Flagstaff\District2.dbf) into your geodatabase, naming it District2, and close ArcCatalog. - Open ArcMap and load your streets feature class into the map, if it isn't already.
- Add table District2 to the map, inspect its fields and contents, then close it.
- On the geocoding toolbar, select your address locator if it isn't already.
- Click the Geocode Addresses button
 . A dialog box opens.
 -
Make sure your address locator is selected and click the OK button to open the Geocode Address dialog. In the Geocode Address dialog box:
- Select address table District2 if it isn't selected already.
- In the Address Input Fields section, make sure the ADDRESS field is selected if it isn't already.
-
In the Output section:
- Make sure the Create static snapshot ... radio button is selected, if it isn't already.
-
Click the Browse SaveData button and set your output to Database feature class in your
Administration feature dataset, naming it Fire_calls.
Click Save.

- Make sure the Create static snapshot ... radio button is selected, if it isn't already.
-
Click the Advance Geometry Options button, and set the Grid Level 1 to 330 feet as in the snapshot
below. Click OK.
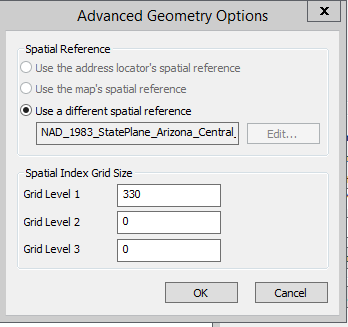
A spatial index can greatly increase performance of spatial operations, just as indexes do in databases. The number of index levels to use and grid size of each level depend on the size of the map extent as well as the type and density of features. In this case, 1 level of index with grid size 330 feet is good enough.
- Select address table District2 if it isn't selected already.
- Click OK and OK to complete geocoding configuration. The Geocoding Addresses... progress bar comes up, and it might take awhile for it to do its work.
Once geocoding is completed, click the Rematch... button
 , and a rematch window displays
after a second or two. This interactive window displays the number as well as the percent of addresses matched, tied and unmatched.
Tied means the match is not unique. The address is matched with a satisfied candidate, but the candidate is tied in matching
score with other candidates. In these cases, you need to look at the tied candidates. An unmatched address does not have a
candidate meeting the minimum matching score. Causes of unmatched addresses can be many and diverse. Many of the unmatched cases are caused by unmatched
house numbers; some have unmatched prefix direction or street types.
, and a rematch window displays
after a second or two. This interactive window displays the number as well as the percent of addresses matched, tied and unmatched.
Tied means the match is not unique. The address is matched with a satisfied candidate, but the candidate is tied in matching
score with other candidates. In these cases, you need to look at the tied candidates. An unmatched address does not have a
candidate meeting the minimum matching score. Causes of unmatched addresses can be many and diverse. Many of the unmatched cases are caused by unmatched
house numbers; some have unmatched prefix direction or street types.
NOTE: the streets in the streets layer may disappear after geocoding is completed, even though the layer is checked so as to be visible. This is because the layer with the fire calls has points that could be all over the united states. This problem will go away once you fix all the unmatched addresses. You can see the streets again by zooming to that layer.
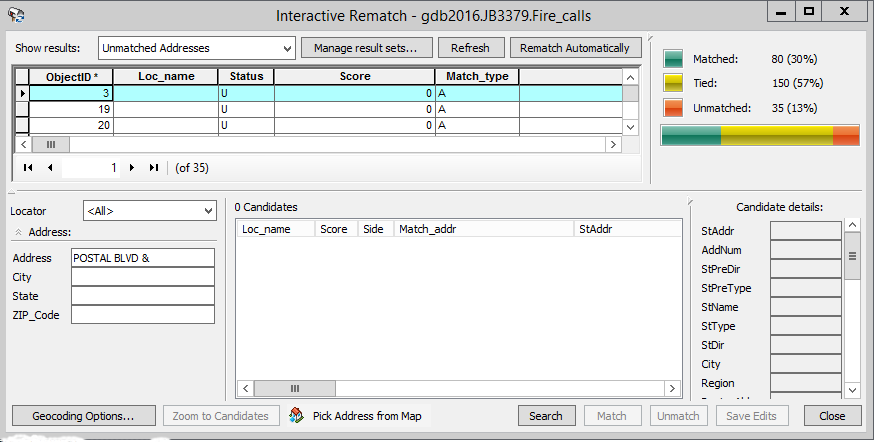
To manually fix unmatched addresses, select Unmatched Addresses in the Show results box if it isn't already, then:
- Select an unmatched address in the upper address table. Candidates display in descending order in the lower candidate box if they exist.
- Examine the most probable candidate which is usually the top one with the highest score. If you think it reasonably matches the input address (for example, the input address may not be perfect such that "st" is mistaken for "ave", or the reference data set is imperfect so that some intermediate house numbers may be missing in a sequence of continuous street segments), click the Match button. Once you manually match an address, the status of this address will change from U to M in the address box.
- If there is no satisfied candidate but you know the location of the address on the map, or else can find the address in google maps or whatever, you can set it manually by using the Pick Address from Map tool. Right-click on the map and select Pick Address to manually set the address.
- Repeat steps a through c above to fix as many addresses as possible. Note that some addresses may never be located due to non-existing house numbers or street names. You can ignore those.
- Click Close to finish, save everything, and close ArcMap.
At this point you should have an Address Locator named Flagstaff Address Locator in the geodatabase and a point feature class named Fire_Calls in your Administration feature dataset.
-
Open ArcCatalog, import the fire incident table District2 from the R drive
(
-
Write at least a 1 page, double-spaced project report. Your report should contain:
- An explanation of how geocoding works in GIS
- A story of your geocoding work. Not step-by-step instructions, but a general history of what you did, the problems you encountered, the solutions you used to fix them, and a summary table including a simple statistics table of the matching scores.
GSP 536Lab 8 – Address Geocoding
|
| Submission: | Project Report as a Word document (Lab8_yourlogin.docx) |
| Due date: | Sunday, November 13, 2016 |