Scenario: Parcel 105-12-001B (APN) is to be developed. The developer designed two alternative preliminary plats (A and B) and submitted them to the Development Review Board. The preliminary plat A was approved, and a final plat was then developed based on it.
- First, you will create two versions: one for each of the preliminary plats A and B using ArcCatlog.
- Then you will subdivide the parcel in each version to create two alternative preliminary plats in ArcMap.
- Once preliminary A is approved, you will create a third version named "Final Plat" based on the preliminary plat A using the version tool in ArcMap and continue to subdivide the land in the final plat version.
- Archive your geodatabase.
- Reconcile your final plat against the default version and post it to the default version.
The diagram below illustrates the procedure.

-
Part One
- Creating the two versions of preliminary plats A and B in ArcCatalog

- Start ArcCatalog and connect to your geodatabase.
-
Right click on your geodatabase connection and select Administration... | Administer Geodatabase to open the
administration dialog. In the Versions tab page, you should only see the default version. Remember that
every geodatabase must have a default version.

- Right click on the Default version and select New.
-
Type a name and description for the new version as the snapshot below. If you want all your co-workers to modify this version you may grant a
Public permission. If you want your co-workers to view this version without modifying it, then you should grant
the Protected permission. For the purpose of this lab, you can simply use
Private.

- Click OK to finish. A new version is created from the default version for Plat A. Repeat this procedure to create the version for Plat B.
-
Part Two
- Working on the alternative preliminary plats
- In ArcCatalog, ensure that your Land feature dataset is registered as versioned; if it is not, register it as versioned, Making sure that the "... move edits to base" option is unchecked. (see this article). Leave ArcCatalog open or your connection will close.
- Start ArcMap and add the Parcel feature class to the map.
-
Click the List By Source button in the Table Of Contents, and change sde.default
to Preliminary plat A. There are two ways to change versions:
-
Right click on the version to change, i.e. SDE.DEFAULT (Horizon), and select Change Version
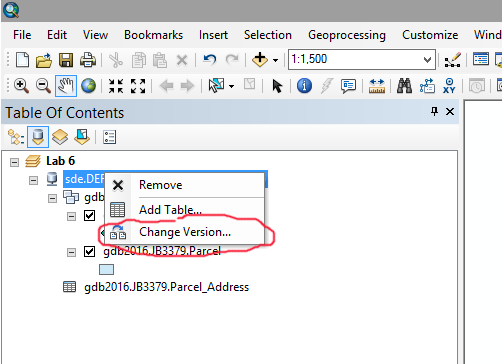
- With the version selected in the TOC, click the Change Version tool in the versioning toolbar.
You'll need the Versioning toolbar, the Snapping toolbar, and all the snapping tools active.
-
Right click on the version to change, i.e. SDE.DEFAULT (Horizon), and select Change Version
-
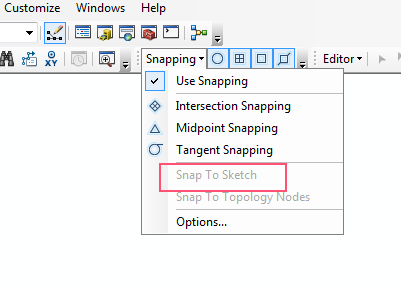
Zoom to parcel 105-12-001B and start an editing session. Click the Snap To Sketch tool
under Snapping in the pull-down menu.
-
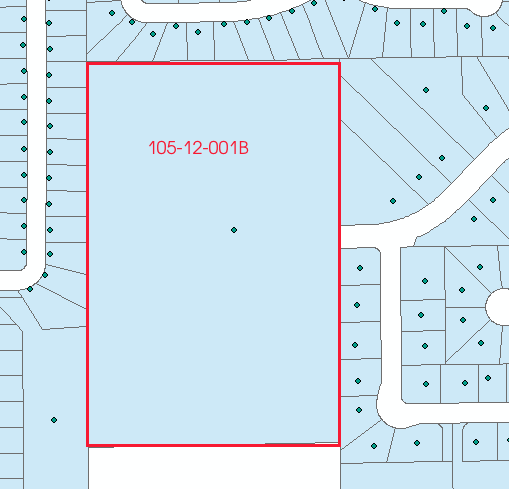
Use the Edit Tool (
 ) to select parcel
105-12-001B to edit.
) to select parcel
105-12-001B to edit.
-
Read the important information below before you do this step!
Select the Cut Polygon Tool ( ), then
pick up the Straight Segment tool (
), then
pick up the Straight Segment tool ( ) to
begin drawing the split shape inside the parcel.
) to
begin drawing the split shape inside the parcel.
IMPORTANT INFORMATION
- You must use the Edit Tool to select a polygon before splitting it. With the Edit Tool selected, it's very easy to accidentally move a parcel polygon. If that happens, undo the action immediately. Fixing a moved polygon later is extremely difficult if not impossible!
-
Begin drawing the split shape by starting from the entrance on the right border (see map below).
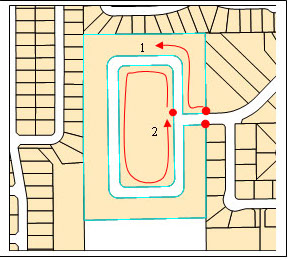
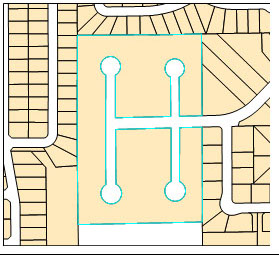
Preliminary Plat A Preliminary Plat B -
During splitting, you need to switch between drawing tools:
- Use the Straight Segment tool to draw the straight line segments.
- Switch to Tangent Curve Segment tool to draw a tangential arc on a corner, then switch back to Straight Segment tool to draw straight lines
- Switch to End Point Arc Segment tool to draw a cul-de-sac circle, then switch back to Straight Segment tool to draw straight lines
- If these tools are not on your editor toolbar, add them first before doing any editing, and save the map so your customizations are saved.

- Double click to end drawing, but do not double click when you switch tools.
All sketch tools support some precision input functions, which are accessed by right clicking:
- Parallel: right click on an existing straight line
- Perpendicular: right click on an existing straight line
- Direction: right click on a blank space
- Length: right click on a blank space
- Absolute x, y: right click on a blank space
- Delta x, y: right click on a blank space
- Direction/Length: right click on a blank space
For more information, see this article.
IF YOU MAKE A MISTAKE: Well, that's another reason why versions are critical. In the next part, if you make a mistake on the Final Plat and it got saved to the database, close ArcMap without saving, open ArcCatalog, go to Administer Database, and delete the bad Final Plat. You can now recreate the Final Plat and start over.
- The width of the road is about 50 feet and dimensions of new rectangle parcels are roughly 140 x 70 feet. Although you do not need to worry too much about accuracy, and it will be fine if your plats look similar to the illustrations in this instruction, you are encouraged to explore and use the precision input functions while sketching.
- After completing the split for preliminary plat A, save your edits, switch to preliminary plat B, then complete the split for that version.
- Delete the road polygons once you finish splitting the parcel.
- Be sure to save your map after you have completed all the edits.
-
Part Three
- Working on the final plat
Once preliminary plat A is approved, a final plat can be developed based on it. You will create a version - name it Final Plat - in this step. This time, you are going to use the versioning tool in ArcMap to create a new version.
- Make sure version Preliminary plat A is the current version in ArcMap.
- Click the Create new version tool.
- Enter version name Final Plat and a description.
-
OK to finish.

-
After you have created a final plat version:
- Set it as current version.
- Start an editing session.
-
Use the Cut Polygon tool to subdivide the land into small pieces as shown below.

- Stop and save your editing.
- Archive the parent version, reconcile and post final version.M
-
Part Four
- Archiving your database before posting the final plat
Once construction is completed, you will reconcile the final plat version against the default version and post it back to the default version. Posting a version to a base version permanently changes the base version. To preserve a historical record of the default version, you need to enable archiving of the land feature dataset.
-
Read the following articles about archiving geodatabases:
-
Now, you will archive your geodatabase and create a historical marker named xxx: Before Platting
(xxx is your login name). To reconcile and post the final plat against the default version:
- Open the Parcel feature class in ArcMap.
- Make sure Final Plat is the current version.
- Start an editing session.
- Click the Reconcile tool in the versioning toolbar and select the default version as the target. Since you are the only user of all the versions, and no ancestral versions are changed after a child version was created, there should be no conflicts after clicking on OK.
- Click the Post tool in the versioning toolbar to post your final plat version onto the default version.
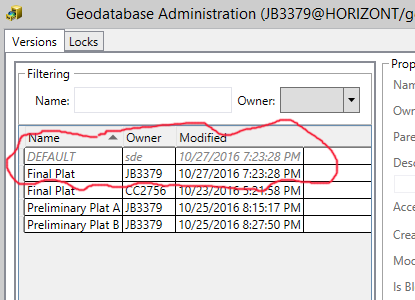
You should now have 3 versions and 1 historical marker in your geodatabase:
- Preliminary Plat A
- Preliminary Plat B
- Final PlatParcel
- xxx: Before Platting
-
Question 1: What did you learn from this lab? List at least 5 things (knowledge/skills/lessons) about versioning and at least 5 things about editing that impressed you the most during the lab.
Question 2: How do you decide whether to check or uncheck the "... move edits to base"?
Question 3: How does geodatabase archiving work? What is a historical marker? Compare historical markers with versions.