In this lab, you will create two topologies: one to ensure that building and address points fall inside parcels properly, and the other to check if the boundaries of USPLS townships, first and second subdivisions, coincide with each other seamlessly. Once a topology is built, you can fix spatial errors in involved feature classes using the topology as a guide. Important: read carefully the sections about versioning and unversioning. You have to wait 24 hours between each step!
-
Parcel_Topology

Topologies can only be created in non-versioned feature datasets. Your Land feature class should currently be versioned if you
completed Lab 4. If you go to Manage | Register As Versioned... and it is grayed out, choose Unregister as versioned. If that
option does not appear in the context menu, you'll have to add it. To do so:
- On ArcCatalog's main menu, choose Customize | Customize Mode...
- Select the Commands tab in the Customize dialog.
- Find Geodatabase tools in the category box on the left.
-
Drag the Register As Versioned and Unregister As Versioned tools from the commands box into the standard toolbar or other toolbars.

We would also like to have both tools in the Enterprise Feature Dataset context menu. To add them:
- Click main menu: Customize | Customize Mode ...
- Select the Toolbars tab in the Customize dialog.
- Check on the Context Menus item. The Context Manus toolbar shows up.
-
Expand the Context Menus and scroll down until you see the Enterprise Feature Dataset Context Menu item, then click on Manage to open that item, as shown in the
image below.

- In the Customize dialog box, switch to the Commands tab
- Find Geodatabase tools in the category box on the left
- Drag the Register As Versioned and Unregister As Versioned tools from the commands box into the Manage sub-menu.
Notes:
- If you right click on a feature dataset and find the Register as Versioned context menu item grayed out, the feature dateaset is already registered as versioned.
- Registering / unregistering a feature dataset as versioned can take a few seconds, and it may sometimes cause the ArcCatalog to stop working. If your ArcCatalog becomes not responding for a long time, close and restart it.
-
Follow the procedure in lecture 6 slides 10-13 to
create a new topology called Parcel_Topology between feature classes Parcel,
Building, and Address.
- In step 3, use Parcel_Topology for the name of the new topology
- In step 4, use 0.1 (feet) for clustering tolerance (you set an xy tolerance of 0.0833 in lab 3)
- In step 5, select feature classes Parcel, Building, and Address.
- In step 7, Parcel - rank 1, building - rank 2, address - rank 3
-
In step 8-11, use the following rules:
Building Must Be Covered By Parcel Address Must Be Properly Inside Parcel
-
You can view the new topology's properties and generate a summary. The summary tells you how many times each rule is violated (# of errors). To view a report of error statistics, right
click on the topology name and select Properties to open the topology properties dialog box. Select the Error tab, and click
the Generate Summary button.
If you see 341 errors - per Slide 15 - you're good!
You can also preview the topology in ArcCatalog. In the preview, each red mark indicates an error identified by the topology. For example, a building sitting on the boundary of a parcel is marked as an error. Note that if you make any change to a validated topology (by changing validation rules or layers, for example), the entire map extent will be marked as a dirty area. In such case, you need to re-validate the topology to update the error report.

- Read through the lab instructions and do not do the rest of this part yet.
- Create a PLS topology in Part 2 ... then come back to this point.
Since errors are detected by the topology, we register the feature dataset as versioned, then use ArcMap to fix them. When registering, Do Not check the Register the selected objects with the option to move edits to base checkbox (click here to see why). Click OK.

 Once you have registered your Land feature dataset as versioned, do the following:
- Close ArcCatalog.
- Open ArcMap. If you saved your map in Lab 4, you can open that.
-
Add the following items to the map from ArcCatalog. If you add Parcel_Topology first, it will ask you if you want to add the other three
automatically:
- Parcel_Topology
- Parcel
- Building
- Address
-
Order layers in the map document by placing polygon layers at bottom and point layers on top so that you can see all of them. Like so:
- Parcel_Topology
- Address
- Building
- Parcel
- Zoom to an error. You will see buildings sitting on parcel borders.
- To fix errors, you need to start an editing session. In the Editor toolbar, click Editor | Start Editing
-
When you move buildings, the snapping settings may get in the way. Turn off all snapping settings by clicking Editor | Snapping | Snapping Toolbar to bring up the snapping toolbar
 , then check off all items (unboxed) in the snapping toolbar.
-
Select the Edit Tool
 in the Editor toolbar, then select an error building and properly move it inside
a parcel.
in the Editor toolbar, then select an error building and properly move it inside
a parcel.
Note:- When you select an error building, make sure only the building is selected. If you happen to select and move a parcel, undo the operation immediately.
-
To avoid accidentally moving parcels, you can turn off selectability of the parcel layer.

-
Even if a building error is fixed, the topology error mark does not go away immediately. You need to validate the topology
to eliminate the error marks for fixed features. There are two ways to validate a topology (SEE ALSO THIS ESRI ARTICLE):
-
Use topology editing tools in the Topology toolbar in an editing session in ArcMap. The Topology toolbar contains a Validate Topology in Specific Area
tool and a Validate Topology in Current Extent tool. You can use the former to draw a rectangle around some fixed errors to validate them, or click
on the latter to validate the current map extent (i.e. area in display). To bring up the topology toolbar, click Editor | More Editing Tools | Topology.

- Validate in ArcCatalog after you finish the editing task.
You have to wait overnight!! until the geodatabase is compressed, and then unregister the feature dataset as versioned. -
Use topology editing tools in the Topology toolbar in an editing session in ArcMap. The Topology toolbar contains a Validate Topology in Specific Area
tool and a Validate Topology in Current Extent tool. You can use the former to draw a rectangle around some fixed errors to validate them, or click
on the latter to validate the current map extent (i.e. area in display). To bring up the topology toolbar, click Editor | More Editing Tools | Topology.
- However: according to this article, ArcSDE Versions 10.1 and later do not have this gotcha.
- Fix all errors with single-family houses.
-
For the condominium buildings that cover many small parcels, you can use the Fix Topology
Tool (next to the last button) on the Topology toolbar to right click on an error, then it mark as an Exception.
-
When you are finished editing, click Editor | Save Edits, Editor | Stop Editing, save your map, then:
Use the Topology toolbar to validate edited features. See step 8.
- Close ArcMap.
- After your 24-hour wait, Open ArcCatalog View error statistics, and preview the topology in ArcCatalog.
-
Unregister the Land feature dataset as versioned.
With ArcGIS Desktop versions 10 and later, the user is granted the privilege to compress the database to move his/her own edits into the base feature classes while unregistering a dataset as versioned. When you see the following message while unregistering a dataset as versioned, check the checkbox in the middle of the message (Compress all edits in the Default version into the base table).
Traditionally, a user without DBA privileges has to wait until the database is compressed in order to unregister a dataset as versioned. Our geodatabase has been scheduled to compress every night at 3:15 a.m. You MUST wait overnight before unregistering your Land feature dataset as versioned!!
The following is a traditional workflow for topology work:
If you work in a small team so that you can conveniently ask the DBA to compress the database, or if you are a DBA yourself, a script can be developed and run at will to compress the database, validate the entire topology, and unregister the database as versioned. In that case, another procedure may be followed:

-
PLS_Topology
In this section, you will create a topology named PLS_Topology in the Land feature dataset to check data integrity of various levels of land subdivisions, specifically to examine whether feature classes of the USPLS townships, first divisions, and second divisions are seamless. Use the following properties for the new topology:
Topology name PLS_Topology Clustering tolerance: 0.1 (feet) Number of ranks: 3 Ranks: Township: 1 1st subdivision: 2 2nd subdivision: 3 Rules: Township Must Not Overlap 1st subdivision Must Not Overlap 2nd subdivision Must Not Overlap Township Area Boundary Must Be Covered By Boundary Of 1st subdivision 1st subdivision Area Boundary Must Be Covered By Boundary Of 2nd subdivision 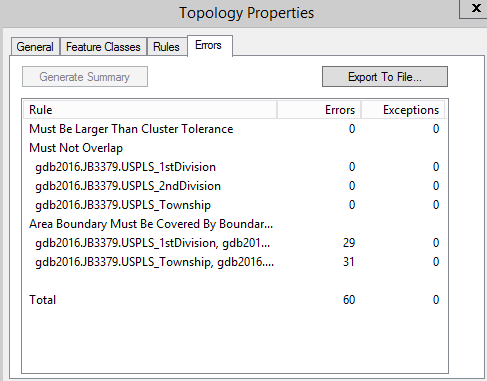
Once this topology is created, you will find a lot of errors when you preview it in ArcCatalog. However, most of the errors reported can be classified as exceptions. The reason is that the township feature class is not completely covered (patted) by the 1st subdivisions. According to the topology rule, if a boundary of the township is not covered by the boundary of the 1st subdivision, an error will be generated. The same situation occurs in the 1st and the 2nd subdivisions. If a boundary of the 1st subdivision is not covered by the 2nd subdivision, an error is reported.
The only time it is a true error is if a parcel is covered by two subdivisions, but their borders do not match exactly.Therefore, an error generated for any other reason can be treated as exceptions and be removed from the topology error list. This can be performed in an editing session in ArcMap.
- Register your Land feature dataset as versioned in ArcCatlog, then close ArcCatalog.
- Open ArcMap, add PLS_Topology and all its participating feature classes to the map.
-
Reorder layers so that you see all layers, like so:
- PLS_Topology
- 2nd subdivision
- 1st subdivision
- township
-
Change the fill color of each layer to hollow (no color) so that you can see through all the layers, and assign a different color for the border of each layer (e.g. township: black; 1st
subdivision: green; 2nd subdivision: blue).
- Start an editing session, and ensure that the topology editing toolbar is visible.
-
Click the Error Inspector tool on the topology
editing toolbar (the last button) to open the error inspector, then click the "Search Now" button to show all errors.
- Click the Fix Topology Error Tool on the topology editing toolbar (next to the last) and click on an error boundary in the map to select an error (once an error is selected, it turns black in the map).
-
If you think a reported error should be classified as an exception, you can right click on it and choose Mark as Exception. Otherwise, just leave it as an
error. You do not need to fix errors in this part of the lab.
- Repeat steps 7 and 8 to mark all those you think should be exceptions and remove them from the error list.
- Validate topology by using the validation tool on the topology editing toolbar.
- Stop editing, save edits, save your map, then close ArcMap.
- After your 24-hour wait, unregister the feature dataset as versioned.
Question: Generally, in what circumstances may you mark an error as an exception?
Submit your answer to the BBLearn dropbox.
