- Follow this link to the redemption site.
- Click "Sign-up for an AWS account" under the "I do not have an AWS account" header
-
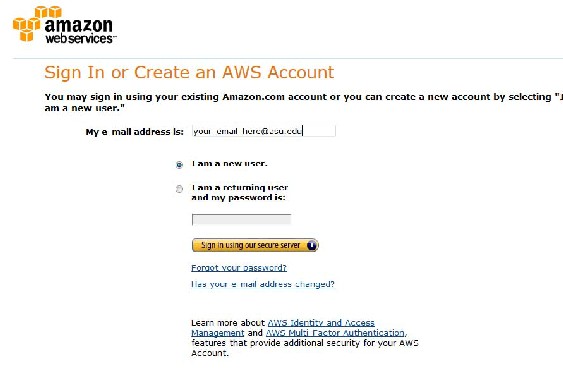
Enter your email address and select "I am a new user.":
-
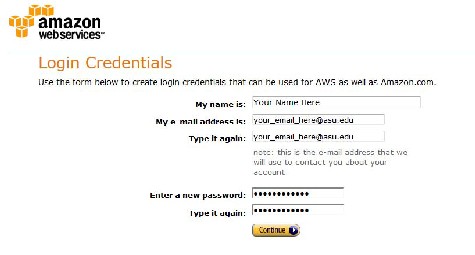
Fill in the required information:
-
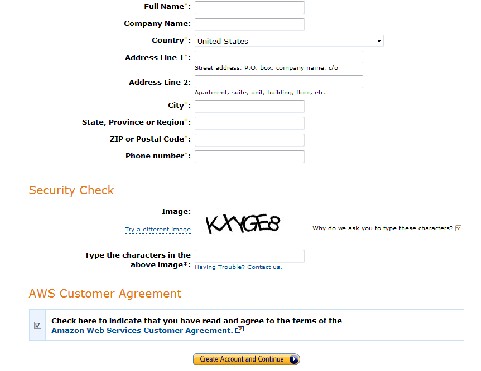
Click "Continue" and fill in the required information on this page:
-
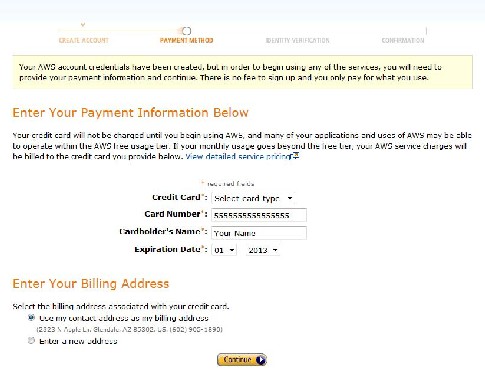
Enter your credit card information. Only if you exceed $100 will your credit card be charged:
-
To verify your account, Amazon will call your cell phone. Enter your phone number in the box and click "Call me now" to prompt the automated phone call:
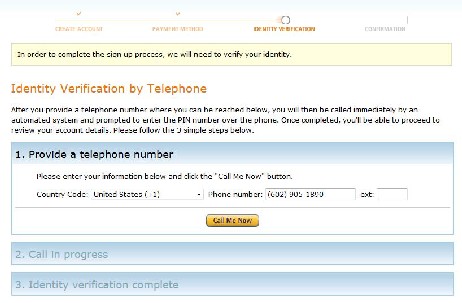
The caller will ask you to enter a pin that is displayed on your screen to prove your identity. This will only take 30-60 seconds. This concludes the registration process. After this is completed, return to the original website -
Enter your promotional code and press redeem like so:

-
Your AWS account is now activated with $100 worth of credits:
-
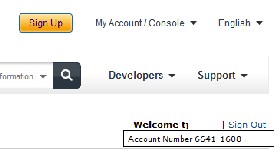
Find your AWS account number in the manage account settings, and get your AWS Access ID and Secret Key by going to "My Account/Console" and select the option for "
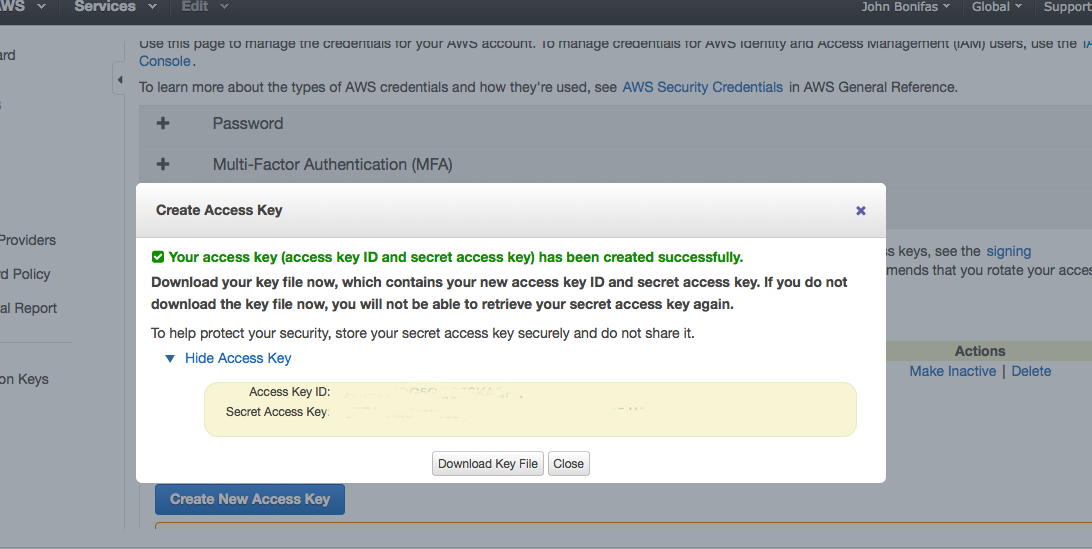
Security Credentials". Create/copy and save your ACCESS KEY ID and SECRET KEY. Do not use / or _ as characters for your secret key. You have to click on 'Create Key' to see the secret key. Note that this is only so that you can access your account - there is a different kind of security for running the commands, see next step. Knowing the difference between these two security configurations is critical!
-
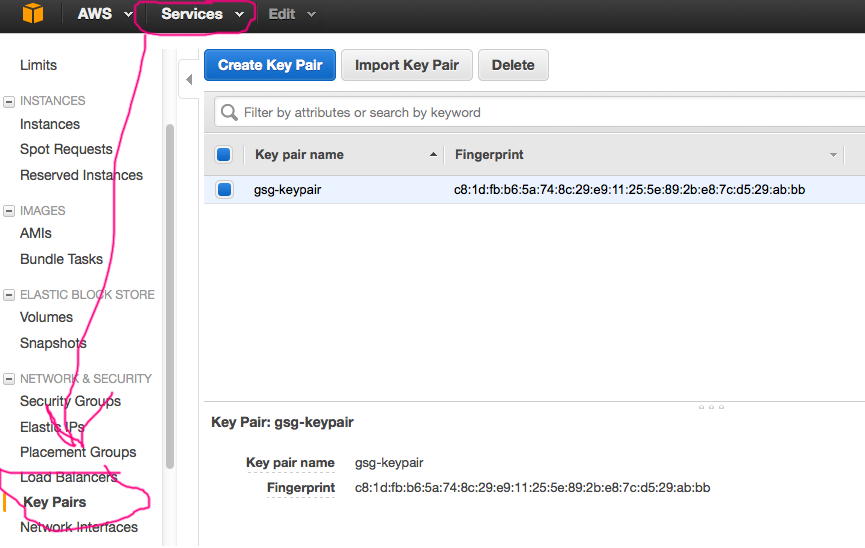
Now for the security for running the commands. Go to Services/EC2, then under Network and Security, choose Key Pairs. Make sure the region is set to 'N. Virginia'.
Create a key pair file, naming it "gsg-keypair". Download and save this file to your ~/.ec2 folder:
If the ~/.ec2 folder does not exist, then your copy of the ACO 420 VM does not have the ec2 tools installed. Follow these instructions to install them:
-
Open a shell prompt, such as Konsole, make sure you are in your home directory (~), and enter the following commands:
mkdir .ec2
chmod 777 .ec2 - Navigate to this web page in your browser.
- Download the zip file and move it to the .ec2 directory you just made.
-
Unzip the file with the following command:
unzip (zip filename)
- Remember the resulting directory name for the tools, as you will need it for step 13.
-
Open a shell prompt, such as Konsole, make sure you are in your home directory (~), and enter the following commands:
-
Open a shell prompt (konsole), and enter the following command to set the appropriate permissons on the keypair file. This is so that the hadoop-ec2 environment can read your command security information.
chmod 600 gsg-keypair.pem
-
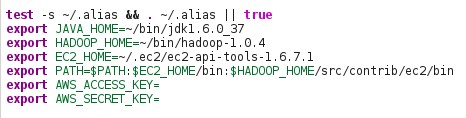
Now we need to update the ~/.bashrc file with your account security information. This file is hidden and located in your home (~) directory. To edit this file, enter the following command:
nano .bashrc
Nano is a command line text editor. You will find two entries in the .bashrc file where you need to add your access and secret keys:export AWS_ACCESS_KEY=
export AWS_SECRET_KEY=The following equivalent lines in the .bashrc file should look something like this:
- Save the file, close the terminal, and reopen it.
-
We will need to add the ID and security keys to the hadoop-ec2 environment. We will also need to add some environment variables. Navigate to the correct folder by entering:
cd ~/bin/Hadoop-1.0.4/src/contrib/ec2/bin
and open thehadoop-ec2-env.shin nano:nano hadoop-ec2-env.sh
-
Add your AWS ID, Access Key, and Secret Key to the following lines. Remove the dashes in the ID if they are there. Note the name of the KEY_NAME entry. This name must match the name of your keyfile name EXACTLY. If it does not, you will get a permissions error in Step 25.

-
Save the file, and exit nano. Test the EC2 command line tools by runnning:
ec2-describe-regions
You should get something like:REGION ap-northeast-1 ec2.ap-northeast-1.amazonaws.com
If you do, then your hadoop-ec2 environment should be configured properly.
REGION ap-southeast-1 ec2.ap-southeast-1.amazonaws.com
... -
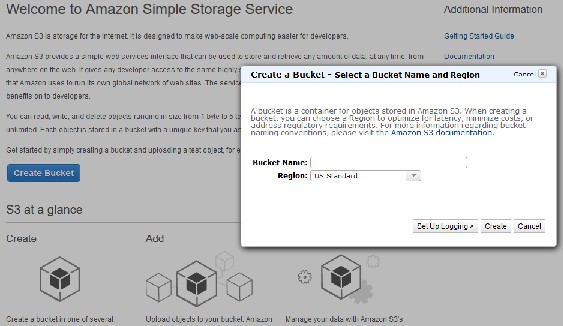
You will need to create an S3 bucket and upload any files (programs and data input files) that you need for running tests in the cloud. In your browser, click services on the top right of the website and select
"S3". Click , name your bucket anything other than 'testbucket', in the U.S. Standard region, then click create. Remember this bucket name for later:
- Go back to the AWS Management Console Home and click "S3" in the list of services.
- Select the bucket you created earlier.
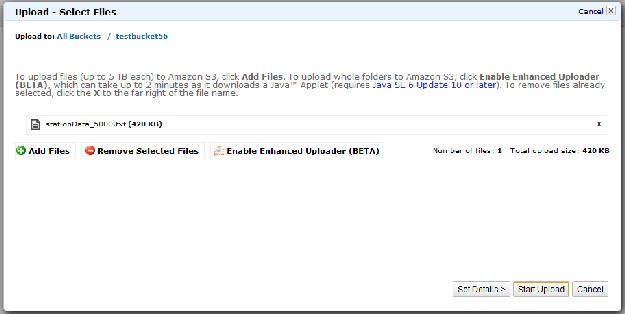
- Click the "Actions" combo box and select upload. Click add files.
- Select the StationData_5000.txt file from ~/Documents/Datafiles/StationData , and the InstructionalSolutions.jar file from ~/bin/Hadoop-1.0.4:
-
Click start upload.
- When the upload finishes, open a shell prompt.
-
Launch a cluster with the following command:
hadoop-ec2 launch-cluster mycluster (number of nodes)
Troubleshooting This Step
It will printout a lot of info, but eventually it will print 'waiting for instance (whatever) to start, then printout a lot of periods. Be prepared to wait a loooong time for it to come back. If you get back a prompt without any errors, your hadoop cluster is running, and you are connected. Move on to Step 26.
However, if you get the "id_rsa-gsg-keypair not found" error, it means that hadoop-ec2 cannot find your keyfile. Navigate to the ~/.ec2 directory if you're not already there, and change the name of your keypair file with the following command:mv gsg-keypair.pem id_rsa-gsg-keypair
If for some reason you're sure the cluster launched but you couldn't connect to it because of permissions or some other mishap, you can check to see if the cluster is running by navigating to the EC2 service home page in a browser. There, if you see:
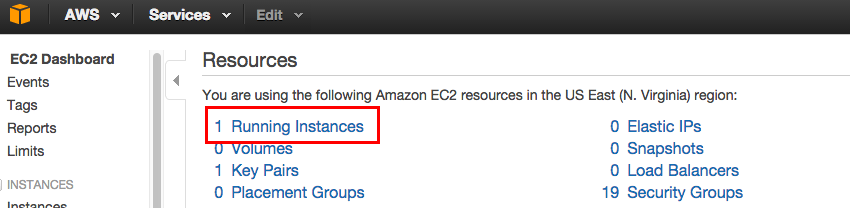
then your cluster is at least booting, and may be running. Click on Running Instances. If you see something like this:

then you can still connect to it by running the proxy and login commands in the next steps by using the Instance ID instead of the cluster name. -
Start the hadoop-ec2 proxy service with the following command:
hadoop-ec2 proxy [cluster name or instance ID] &
You may have to hit ENTER to return to the prompt. This command will give you the web URLs to the cluster's job tracker and namenodes:JobTracker: http://ec2-52-1-87-251.compute-1.amazonaws.com:50030/
NameNode: http://ec2-52-1-87-251.compute-1.amazonaws.com:50070/ -
Login to your new cluster with the following command:
hadoop-ec2 login [cluster name or instance ID]
You are now at the command prompt of the master node of your cluster rather than your local computer. You should notice a change in your command line that reflects this. -
Change your working directory to /usr/local/hadoop-0.19.0 with the cd command, and transfer your .jar and data files from the S3 bucket to the HDFS using the following example commands. Dont' worry if it says that the files do not exist, it's because they're new, and ignore the running job part:
bin/hadoop distcp \s3n://(accesskey):(secretkey)@(bucketname)/(filename).jar (filename).jar
bin/hadoop distcp \s3n://(accesskey):(secretkey)@(bucketname)/(filename).txt InputData/(filename).txt -
Clean up one of the output files with this command:
bin/hadoop fs -rmr InputData/_distcp*
-
Get the jar file from the HDFS and save it on the master node:
bin/hadoop fs -get InstructionalSolutions.jar InstructionalSolutions.jar
-
...And FINALLY, run the MapReduce job using this example command:
bin/hadoop jar InstructionalSolutions.jar AverageTempByStation InputData OutputData 2
If it ran, congratulations, you're almost there! -
Get the output data file:
bin/hadoop fs -get OutputData OutputData
-
Read the output file:
cat OutputData/part*
- HOLY COW, YOU'RE DONE!! You can now logout of the master node by typing exit!
-
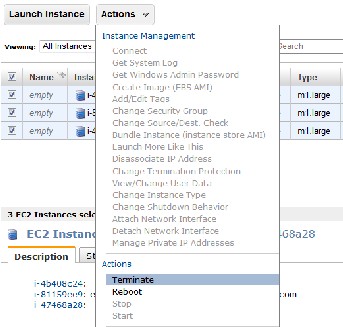
Go back to the AWS EC2 page and click "Running Instances", and terminate all running instances by checking all the boxes left of the name and choosing the terminate option in the "actions" tab.
IF YOU FAIL TO DO THIS, YOU WILL BE CHARGED PER MACHINE HOUR SPENT IDLE!