Elastic Compute Cloud (EC2) is the Amazon Web Service you use to create and run virtual machines in the cloud. AWS calls these virtual machines 'instances'. This step-by-step guide will help you successfully launch a Hostgator-like VPS on Amazon EC2 within the AWS Free Tier, and not have to deal with Hostgator anymore.

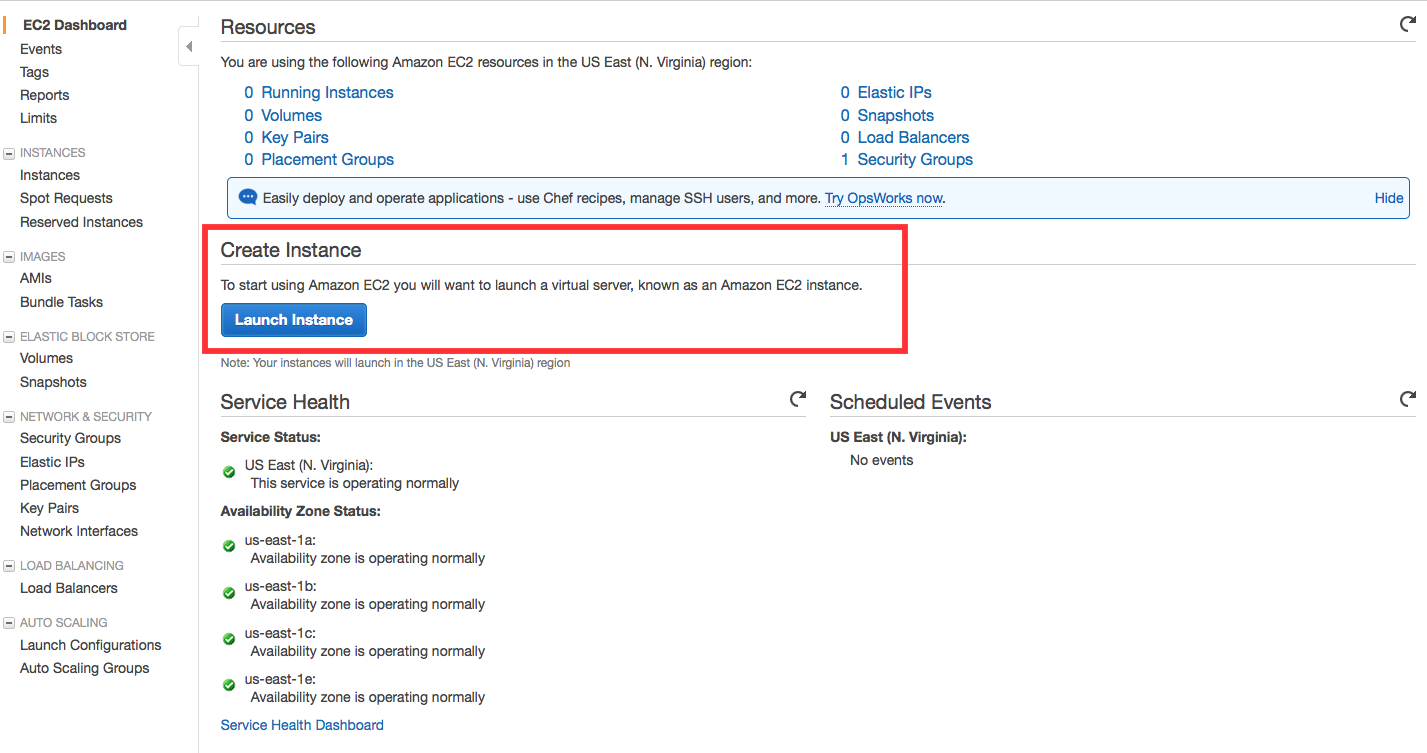
You are now in the EC2 Launch Instance Wizard, which will help you configure and launch your instance.
Learn more about:
For this tutorial, find Amazon Linux AMI and click Select.

b. You will now choose an instance type. Instance types comprise of varying combinations of CPU, memory, storage, and networking capacity so you can choose the appropriate mix for your applications. For more information, see Amazon EC2 Instance Types.
The default option of t2.micro should already be checked. This instance type is covered within the Free Tier and offers enough compute capacity to tackle simple workloads. Click Review and Launch at the bottom of the page.


d. On the next screen you will be asked to choose an existing key pair or create a new key pair. A key pair is used to securely access your Linux instance using SSH. AWS stores the public part of the key pair which is just like a house lock. You download and use the private part of the key pair which is just like a house key.
Select Create a new key pair and give it the name MyKeyPair. Next click the Download Key Pair button.
After you download the MyKeyPair key, you will want to store your key in a secure location. If you lose your key, you won't be able to access your instance. If someone else gets access to your key, they will be able to access your instance.
Select your operating system below to see instructions on where to save your SSH key.
After you have stored your key pair, click Launch Instance to start your Linux instance.


f. In a few minutes, the Instance State column on your instance will change to "running" and a Public IP address will be shown. You can refresh these Instance State columns by pressing the refresh button on the right just above the table. Copy the Public IP address of your AWS instance, so you can use it when we connect to the instance using SSH in Step 3.

After launching your instance, it's time to connect to it using SSH.
Mac/Linux users: Enter ssh -i ~/.ssh/MyKeyPair.pem centos@{IP_Address}
(ex. ssh -i ~/.ssh/HostgatorOnAWS.pem centos@54.189.130.155)
Windows users: Enter ssh -i 'c:\Users\yourusername\.ssh\MyKeyPair.pem' centos@{IP_Address}
(ex. ssh -i 'c:\Users\adamglic\.ssh\HostgatorOnAWS.pem' centos@54.189.130.155)
yum, in that order, putting the <?php phpinfo(); ?> line in a index.php file in the
/var/www/html folder, and restarting the web server daemon:
sudo service httpd restart
or
sudo systemctl restart httpd
To allow the centos account to manipulate files in this directory, you must modify the ownership and permissions of the directory. There are many ways to accomplish this task.
In this tutorial, you add centos to the apache group, to give the apache group ownership of the /var/www directory and assign write permissions to the group.
To set file permissions
-
Add the centos user to the apache group.
[centos ~]$ sudo usermod -a -G apache centos -
Log out and then log back in again to pick up the new group, and then verify your membership.
-
Log out (use the exit command or close the terminal window):
[centos ~]$ exit -
To verify your membership in the apache group, reconnect to your instance, and then run the following command:
[centos ~]$ groups centos wheel apache
-
-
Change the group ownership of /var/www and its contents to the apache group.
[centos ~]$ sudo chown -R centos:apache /var/www -
To add group write permissions and to set the group ID on future subdirectories, change the directory permissions of /var/www and its subdirectories.
[centos ~]$ sudo chmod 2775 /var/www
[centos ~]$ find /var/www -type d -exec sudo chmod 2775 {} \; -
To add group write permissions, recursively change the file permissions of /var/www and its subdirectories:
[centos ~]$ find /var/www -type f -exec sudo chmod 0664 {} \;
Now, the centos user (and any future members of the apache group) can add, delete, and edit files in the Apache document root, enabling you to add content, such as a static website
or a PHP application.
A.
To add a password to the centos account:
1. Connect to your EC2 instance running Linux by using SSH.
2. Assume root user permissions by running the following command:
$ sudo su
3. Create a password for the centos user by running the following command:
# passwd centos
4. When prompted, enter your password, and then enter it again to confirm it.
B.
To Enable SSH Password Authentication
Some server providers, such as Amazon EC2 and Google Compute Engine, disable SSH password authentication by default. That is, you can only log in over SSH using public key authentication.
SFTP is a protocol that runs over SSH, so this means SFTP using passwords will not work by default when SSH password authentication is disabled.
To enable SSH password authentication, you must edit this file:
/etc/ssh/sshd_config
Then, change the line
PasswordAuthentication no
to
PasswordAuthentication yes
After making that change, restart the SSHD daemon by running the following command as root:
sudo service sshd restartEnable Logging In as root:
Some providers also disable the ability to SSH in directly as root. In those cases, they created a different user for you that has sudo privileges (often named centos). With that user, you can get a root shell and change/set the root password by running the commands:
sudo -i
sudo passwd root
If you instead want to be able to directly SSH in as root, again edit this file:
/etc/ssh/sshd_config
And change the line
PermitRootLogin no
to
PermitRootLogin yes
After making that change, restart the SSH service by running the following command as root:
sudo service httpd restart
or
sudo systemctl restart httpd
You should now be able to login using Mindterm.
For historical reasons, web encryption is often referred to simply as SSL. While web browsers still support SSL, its successor protocol TLS is less vulnerable to attack. Amazon Linux 2 disables all versions of SSL by default and recommends disabling TLS version 1.0, as described below. Only TLS 1.1 and 1.2 may be safely enabled.
Important
These procedures are intended for use with Amazon Linux 2. We also assume that you are starting with a fresh EC2 instance. If you are trying to set up a LAMP web server on a different distribution, or if you are re-purposing an older, existing instance, some procedures in this tutorial might not work for you. For information about LAMP web servers on Ubuntu, see the Ubuntu community documentation ApacheMySQLPHP topic. For information about Red Hat Enterprise Linux, see the Customer Portal topic Web Servers.
Step A: Enable SSL/TLS on the Server
This procedure takes you through the process of setting up SSL/TLS on Amazon Linux 2 with a self-signed digital certificate.
Note
A self-signed certificate is acceptable for testing but not production. If you expose your self-signed certificate to the internet, visitors to your site are greeted by security warnings.
To enable SSL/TLS on a server
-
Connect to your instance and confirm that Apache is running.
[centos ~]$ sudo systemctl is-enabled httpdIf the returned value is not "enabled," start Apache and set it to start each time the system boots:
[centos ~]$ sudo systemctl start httpd && sudo systemctl enable httpd -
To ensure that all of your software packages are up-to-date, perform a quick software update on your instance. This process may take a few minutes, but it is important to make sure that you have the latest security updates and bug fixes.
Note
The -y option installs the updates without asking for confirmation. If you would like to examine the updates before installing, you can omit this option.
[centos ~]$ sudo yum update -y -
Now that your instance is current, add SSL/TLS support by installing the Apache module mod_ssl:
[centos ~]$ sudo yum install -y mod_sslLater in this tutorial, you work with three important files that have been installed:
-
/etc/httpd/conf.d/ssl.conf
The configuration file for mod_ssl. It contains "directives" telling Apache where to find encryption keys and certificates, the SSL/TLS protocol versions to allow, and the encryption ciphers to accept.
-
/etc/pki/tls/private/localhost.key
An automatically generated, 2048-bit RSA private key for your Amazon EC2 host. During installation, OpenSSL used this key to generate a self-signed host certificate, and you can also use this key to generate a certificate signing request (CSR) to submit to a certificate authority (CA).
Note
If you can't see this file in a directory listing, it may be due to its restrictive access permissions. Try running sudo ls -al inside the directory.
-
/etc/pki/tls/certs/localhost.crt
An automatically generated, self-signed X.509 certificate for your server host. This certificate is useful for testing that Apache is properly set up to use SSL/TLS.
The .key and .crt files are both in PEM format, which consists of Base64-encoded ASCII characters framed by "BEGIN" and "END" lines, as in this abbreviated example of a certificate:
-----BEGIN CERTIFICATE----- MIIEazCCA1OgAwIBAgICWxQwDQYJKoZIhvcNAQELBQAwgbExCzAJBgNVBAYTAi0t MRIwEAYDVQQIDAlTb21lU3RhdGUxETAPBgNVBAcMCFNvbWVDaXR5MRkwFwYDVQQK DBBTb21lT3JnYW5pemF0aW9uMR8wHQYDVQQLDBZTb21lT3JnYW5pemF0aW9uYWxV bml0MRkwFwYDVQQDDBBpcC0xNzItMzEtMjAtMjM2MSQwIgYJKoZIhvcNAQkBFhVy ... z5rRUE/XzxRLBZOoWZpNWTXJkQ3uFYH6s/sBwtHpKKZMzOvDedREjNKAvk4ws6F0 WanXWehT6FiSZvB4sTEXXJN2jdw8g+sHGnZ8zCOsclknYhHrCVD2vnBlZJKSZvak 3ZazhBxtQSukFMOnWPP2a0DMMFGYUHOd0BQE8sBJxg== -----END CERTIFICATE-----The file names and extensions are a convenience and have no effect on function. You can call a certificate cert.crt, cert.pem, or any other file name, so long as the related directive in the ssl.conf file uses the same name.
Note
When you replace the default SSL/TLS files with your own customized files, be sure that they are in PEM format.
-
-
Reboot your instance and reconnect to it. AWS recommends rebooting the VPS via the console, not the reboot command. Here's how:
- Go to the console, then to your dashboard.
- Navigate to EC2 dashboard | Instances | Instances. If you don't see your VPS there, check other regions like Oregon.
- Select the instance and choose Actions, Instance State, Reboot.
-
Restart Apache.
[centos ~]$ sudo systemctl restart httpdNote
Make sure the TCP port 443 is accessible on your EC2 instance, as described above.
-
Your Apache web server should now support HTTPS (secure HTTP) over port 443. Test it by typing the IP address or fully qualified domain name of your EC2 instance into a browser URL bar with the prefix https://. Because you are connecting to a site with a self-signed, untrusted host certificate, your browser may display a series of security warnings.
Override the warnings and proceed to the site. If the default Apache test page opens, it means that you have successfully configured SSL/TLS on your server. All data passing between the browser and server is now encrypted.
To prevent site visitors from encountering warning screens, you need to obtain a trusted certificate that not only encrypts, but also publicly authenticates you as the owner of the site.
Step B: Obtain a CA-signed Certificate
This section describes the process of generating a certificate signing request (CSR) from a private key, submitting the CSR to a certificate authority (CA), obtaining a signed host certificate, and configuring Apache to use it.
A self-signed SSL/TLS X.509 host certificate is cryptologically identical to a CA-signed certificate. The difference is social, not mathematical. A CA promises to validate, at a minimum, a domain's ownership before issuing a certificate to an applicant. Each web browser contains a list of CAs trusted by the browser vendor to do this. An X.509 certificate consists primarily of a public key that corresponds to your private server key, and a signature by the CA that is cryptographically tied to the public key. When a browser connects to a web server over HTTPS, the server presents a certificate for the browser to check against its list of trusted CAs. If the signer is on the list, or accessible through a chain of trust consisting of other trusted signers, the browser negotiates a fast encrypted data channel with the server and loads the page.
Certificates generally cost money because of the labor involved in validating the requests, so it pays to shop around. A list of well-known CAs can be found at dmoztools.net. A few CAs offer basic-level certificates free of charge. The most notable of these is the Let's Encrypt project, which also supports the automation of the certificate creation and renewal process. For more information about using Let's Encrypt as your CA, see Appendix: Let's Encrypt with Certbot on Amazon Linux 2 2.
Underlying the host certificate is the key. As of 2017, government and industry groups recommend using a minimum key (modulus) size of 2048 bits for RSA keys intended to protect documents through 2030. The default modulus size generated by OpenSSL in Amazon Linux 2 is 2048 bits, which means that the existing autogenerated key is suitable for use in a CA-signed certificate. An alternative procedure is described below for those who desire a customized key, for instance one with a larger modulus or using a different encryption algorithm.
To obtain a CA-signed certificate
-
Connect to your instance and navigate to
/etc/pki/tls/private/. This is the directory where the server's private key for SSL/TLS is stored. If you prefer to use your existing host key to generate the CSR, skip to Step 3. -
(Optional) Generate a new private key. Here are some sample key configurations. Any of the resulting keys work with your web server, but they vary in the degree and type of security that they implement.
-
As a starting point, here is the command to create an RSA key resembling the default host key on your instance:
[centos ~]$ sudo openssl genrsa -out custom.key 2048The resulting file, custom.key, is a 2048-bit RSA private key.
-
To create a stronger RSA key with a bigger modulus, use the following command:
[centos ~]$ sudo openssl genrsa -out custom.key 4096The resulting file, custom.key, is a 4096--bit RSA private key.
-
To create a 4096-bit encrypted RSA key with password protection, use the following command:
[centos ~]$ sudo openssl genrsa -aes128 -passout pass:abcde12345 -out custom.key 4096This results in a 4096-bit RSA private key that has been encrypted with the AES-128 cipher.
Important
Encrypting the key provides greater security, but because an encrypted key requires a password, services depending on it cannot be auto-started. Each time you use this key, you need to supply the password "abcde12345" over an SSH connection.
-
RSA cryptography can be relatively slow, because its security relies on the difficulty of factoring the product of two large two prime numbers. However, it is possible to create keys for SSL/TLS that use non-RSA ciphers. Keys based on the mathematics of elliptic curves are smaller and computationally faster when delivering an equivalent level of security. Here is an example:
[centos ~]$ sudo openssl ecparam -name prime256v1 -out custom.key -genkeyThe output in this case is a 256-bit elliptic curve private key using prime256v1, a "named curve" that OpenSSL supports. Its cryptographic strength is slightly greater than a 2048-bit RSA key, according to NIST.
Note
Not all CAs provide the same level of support for elliptic-curve-based keys as for RSA keys.
Make sure that the new private key has highly restrictive ownership and permissions (owner=root, group=root, read/write for owner only). The commands would be as follows:
[centos ~]$ sudo chown root.root custom.key
[centos ~]$ sudo chmod 600 custom.key
[centos ~]$ ls -al custom.key
The commands above should yield the following result:
-rw------- root root custom.keyAfter you have created and configured a satisfactory key, you can create a CSR.
-
-
Create a CSR using your preferred key. The example below uses custom.key:
[centos ~]$ sudo openssl req -new -key custom.key -out csr.pemOpenSSL opens a dialog and prompts you for information shown in the table below. All of the fields except Common Name are optional for a basic, domain-validated host certificate.
Name Description Example Country Name The two-letter ISO abbreviation for your country. US (=United States) State or Province Name The name of the state or province where your organization is located. This name cannot be abbreviated. Washington Locality Name The location of your organization, such as a city. Seattle Organization Name The full legal name of your organization. Do not abbreviate your organization name. Example Corporation Organizational Unit Name Additional organizational information, if any. Example Dept Common Name This value must exactly match the web address that you expect users to type into a browser. Usually, this means a domain name with a prefixed host name or alias in the formwww.example.com. In testing with a self-signed certificate and no DNS resolution, the common name may consist of the host name alone. CAs also offer more expensive certificates that accept wild-card names such as *.example.com.
www.example.com Email Address The server administrator's email address. someone@example.com Finally, OpenSSL prompts you for an optional challenge password. This password applies only to the CSR and to transactions between you and your CA, so follow the CA's recommendations about this and the other optional field, optional company name. The CSR challenge password has no effect on server operation.
The resulting file csr.pem contains your public key, your digital signature of your public key, and the metadata that you entered.
-
Submit the CSR to a CA. This usually consists of opening your CSR file in a text editor and copying the contents into a web form. At this time, you may be asked to supply one or more subject alternate names (SANs) to be placed on the certificate. If www.example.com is the common name, then example.com would be a good SAN, and vice versa. A visitor to your site typing in either of these names would see an error-free connection. If your CA web form allows it, include the common name in the list of SANs. Some CAs include it automatically.
After your request has been approved, you will receive a new host certificate signed by the CA. You may also be instructed to download an intermediate certificate file that contains additional certificates needed to complete the CA's chain of trust.
Note
Your CA may send you files in multiple formats intended for various purposes. For this tutorial, you should only use a certificate file in PEM format, which is usually (but not always) marked with a .pem or .crt extension. If you are uncertain which file to use, open the files with a text editor and find the one containing one or more blocks beginning with the following:
- - - - -BEGIN CERTIFICATE - - - - -The file should also end with the following:
- - - -END CERTIFICATE - - - - -You can also test a file at the command line as follows:
[centos certs]$ openssl x509 -in certificate.crt -textExamine the output for the tell-tale lines described above. Do not use files ending with .p7b, .p7c, or similar extensions.
-
Remove or rename the old self-signed host certificate localhost.crt from the /etc/pki/tls/certsdirectory and place the new CA-signed certificate there (along with any intermediate certificates).
Note
There are several ways to upload your new certificate to your EC2 instance, but the most straightforward and informative way is to open a text editor (vi, nano, notepad, etc.) on both your local computer and your instance, and then copy and paste the file contents between them. You need root [sudo] privileges when performing these operations on the EC2 instance. This way, you can see immediately if there are any permission or path problems. Be careful, however, not to add any additional lines while copying the contents, or to change them in any way.
From inside the /etc/pki/tls/certs directory, check that the file ownership, group, and permission settings match the highly restrictive Amazon Linux 2 defaults (owner=root, group=root, read/write for owner only). The commands would be as follows:
[centos certs]$ sudo chown root.root custom.crt [centos certs]$ sudo chmod 600 custom.crt [centos certs]$ ls -al custom.crtThe commands above should yield the following result:
-rw------- root root custom.crtThe permissions for the intermediate certificate file are less stringent (owner=root, group=root, owner can write, group can read, world can read). The commands would be:
[centos certs]$ sudo chown root.root intermediate.crt [centos certs]$ sudo chmod 644 intermediate.crt [centos certs]$ ls -al intermediate.crtThe commands above should yield the following result:
-rw-r--r-- root root intermediate.crt -
If you used a custom key to create your CSR and the resulting host certificate, remove or rename the old key from the /etc/pki/tls/private/ directory, and then install the new key there.
Note
There are several ways to upload your custom key to your EC2 instance, but the most straightforward and informative way is to open a text editor (vi, nano, notepad, etc.) on both your local computer and your instance, and then copy and paste the file contents between them. You need root [sudo] privileges when performing these operations on the EC2 instance. This way, you can see immediately if there are any permission or path problems. Be careful, however, not to add any additional lines while copying the contents, or to change them in any way.
From inside the /etc/pki/tls/private directory, check that the file ownership, group, and permission settings match the highly restrictive Amazon Linux 2 defaults (owner=root, group=root, read/write for owner only). The commands would be as follows:
[centos private]$ sudo chown root.root custom.key [centos private]$ sudo chmod 600 custom.key [centos private]$ ls -al custom.keyThe commands above should yield the following result:
-rw------- root root custom.key -
Because the file name of the new CA-signed host certificate (custom.crt in this example) probably differs from the old certificate, edit /etc/httpd/conf.d/ssl.conf and provide the correct path and file name using Apache's SSLCertificateFile directive:
SSLCertificateFile /etc/pki/tls/certs/custom.crtIf you received an intermediate certificate file (intermediate.crt in this example), provide its path and file name using Apache's SSLCACertificateFile directive:
SSLCACertificateFile /etc/pki/tls/certs/intermediate.crtNote
Some CAs combine the host certificate and the intermediate certificates in a single file, making this directive unnecessary. Consult the instructions provided by your CA.
If you installed a custom private key (custom.key in this example), provide its path and file name using Apache's SSLCertificateKeyFile directive:
SSLCertificateKeyFile /etc/pki/tls/private/custom.key -
Save /etc/httpd/conf.d/ssl.conf and restart Apache.
[centos ~]$ sudo systemctl restart httpd